文件服务器 1.构建NFS远程共享存储 1 2 3 4 5 6 7 文件系统级别共享(是NAS存储) --------- 已经做好了格式化,可以直接用。 速度慢比如:nfs,samba ===================================================== 因为NFS有很多功能,不同的功能需要使用不同的端口。因此NFS无法固定端口。而RPC会记录NFS端口的信息,这样就能够通过RPC实现服务端和客户端的RPC来沟通端口信息。 那RPC和NFS之间又是如何之间相互通讯的? 首先当NFS启动后,就会随机的使用一些端口,然后NFS就会向RPC去注册这些端口。RPC就会记录下这些端口。并且RPC会开启111端口,等待客户端RPC的请求,如果客户端有请求,那服务端的RPC就会将记录的NFS端口信息告知客户端。
1 2 3 NFS NFS:Network File System 网络文件系统,NFS 和其他文件系统一样,是在 Linux 内核中实现的,因此 NFS 很难做到与 Windows 兼容。NFS 共享出的文件系统会被客户端识别为一个文件系统,客户端可以直接挂载并使用。是Unix系统之间共享文件的一种协议 NFS 文件系统仅支持基于 IP 的用户访问控制,NFS 的客户端主要为Linux。
1 2 3 4 实验环境准备两台机器 支持多节点同时挂载以及并发写入 服务端:nfs-server 192.168.100.60 客户端:web1 192.168.100.70
1 2 3 4 centos7(服务端和客户端都关闭防火墙和selinux内核防火墙) # systemctl stop firewalld # systemctl disable firewalld # setenforce 0
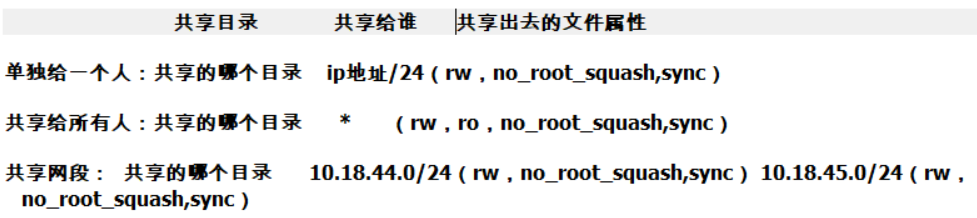
实例 1 2 3 4 5 6 7 8 9 10 11 12 13 14 15 16 17 18 19 20 21 22 23 24 25 26 27 28 29 30 31 32 33 34 35 36 37 38 39 40 41 42 43 44 45 46 47 48 49 50 51 52 53 54 55 56 57 58 59 60 61 62 63 64 65 66 67 68 69 70 71 72 73 74 75 76 77 78 79 NFS-server操作 [root@nfs-server ~]# setenforce 0 [root@nfs-server ~]# systemctl stop firewalld 分区格式化挂载 [root@nfs-server ~]# fdisk /dev/sdb 欢迎使用 fdisk (util-linux 2.23.2)。 更改将停留在内存中,直到您决定将更改写入磁盘。 使用写入命令前请三思。 Device does not contain a recognized partition table 使用磁盘标识符 0x2dbf8bc5 创建新的 DOS 磁盘标签。 命令(输入 m 获取帮助):n Partition type: p primary (0 primary, 0 extended, 4 free) e extended Select (default p): p 分区号 (1-4,默认 1):1 起始 扇区 (2048-41943039,默认为 2048): 将使用默认值 2048 Last 扇区, +扇区 or +size{K,M,G} (2048-41943039,默认为 41943039):+20G 值超出范围。 Last 扇区, +扇区 or +size{K,M,G} (2048-41943039,默认为 41943039):+10G 分区 1 已设置为 Linux 类型,大小设为 10 GiB 命令(输入 m 获取帮助):W The partition table has been altered! Calling ioctl() to re-read partition table. 正在同步磁盘。 [root@localhost ~]# lsblk NAME MAJ:MIN RM SIZE RO TYPE MOUNTPOINT sda 8:0 0 20G 0 disk ├─sda1 8:1 0 1G 0 part /boot └─sda2 8:2 0 19G 0 part ├─centos-root 253:0 0 17G 0 lvm / └─centos-swap 253:1 0 2G 0 lvm [SWAP] sdb 8:16 0 20G 0 disk └─sdb1 8:17 0 10G 0 part sr0 11:0 1 4.4G 0 rom [root@nfs-server ~]# mkfs.xfs /dev/sdb1 meta-data=/dev/sdb1 isize=512 agcount=4, agsize=655360 blks = sectsz=512 attr=2, projid32bit=1 = crc=1 finobt=0, sparse=0 data = bsize=4096 blocks=2621440, imaxpct=25 = sunit=0 swidth=0 blks naming =version 2 bsize=4096 ascii-ci=0 ftype=1 log =internal log bsize=4096 blocks=2560, version=2 = sectsz=512 sunit=0 blks, lazy-count=1 realtime =none extsz=4096 blocks=0, rtextents=0 [root@nfs-server ~]# mount /dev/sdb1 /XFS/ [root@nfs-server ~]# df -Th 文件系统 类型 容量 已用 可用 已用% 挂载点 devtmpfs devtmpfs 475M 0 475M 0% /dev tmpfs tmpfs 487M 0 487M 0% /dev/shm tmpfs tmpfs 487M 7.7M 479M 2% /run tmpfs tmpfs 487M 0 487M 0% /sys/fs/cgroup /dev/mapper/centos-root xfs 17G 1.6G 16G 10% / /dev/sda1 xfs 1014M 138M 877M 14% /boot tmpfs tmpfs 98M 0 98M 0% /run/user/0 /dev/sdb1 xfs 10G 33M 10G 1% /XFS [root@nfs-server ~]# yum -y install rpcbind #安装rpc协议的包 [root@nfs-server ~]# yum -y install nfs-utils #安装nfs服务,提供文件系统 启动服务 [root@nfs-server ~]# systemctl start nfs [root@nfs-server ~]# systemctl start rpcbind [root@nfs-server ~]# mkdir /XFS #创建存储目录 [root@nfs-server ~]# echo "nfs-test" >> /XFS/index.html #制作test文件 [root@nfs-server ~]# vim /etc/exports #编辑共享文件 /XFS 192.168.100.0/24(rw,no_root_squash,sync) 可选参数注释: ro:只读 rw:读写 *:表示共享给所有网段。 sync:所有数据在请求时写入共享 root_squash: 对于使用分享目录的使用者如果是root用户,那么这个使用者的权限将被压缩成为匿名使用者,只读权限。 no_root_squash:使用分享目录的使用者,如果是 root 的话,那么对于这个分享的目录来说,他就具有 root 的权限。
1 2 3 4 [root@nfs-server ~]# systemctl restart nfs-server #重启服务。 [root@nfs-server ~]# systemctl enable nfs-server #制作开机启 [root@nfs-server ~]# exportfs -v #确认 NFS 服务器启动 /XFS 192.168.100.0/24(sync,wdelay,hide,no_subtree_check,sec=sys,rw,secure,no_root_squash,no_all_squash)
1 2 3 4 5 6 7 8 9 10 11 12 13 14 15 16 17 18 19 20 21 22 23 24 25 26 27 28 29 30 31 32 33 34 35 36 37 38 39 40 41 42 43 web1 客户端操作 [root@web1 ~]# setenforce 0 [root@web1 ~]# systemctl stop firewalld [root@web1 ~]# yum -y install rpcbind [root@web1 ~]# yum -y install nfs-utils 启动服务 [root@web1 ~]# systemctl start nfs [root@web1 ~]# systemctl start rpcbind [root@web1 ~]# mkdir /nfs #创建挂载点 [root@web1 ~]# mount -t nfs 192.168.100.60:/XFS /nfs #挂载 [root@web1 ~]# df -Th 文件系统 类型 容量 已用 可用 已用% 挂载点 devtmpfs devtmpfs 475M 0 475M 0% /dev tmpfs tmpfs 487M 0 487M 0% /dev/shm tmpfs tmpfs 487M 7.8M 479M 2% /run tmpfs tmpfs 487M 0 487M 0% /sys/fs/cgroup /dev/mapper/centos-root xfs 17G 1.6G 16G 10% / /dev/sda1 xfs 1014M 138M 877M 14% /boot tmpfs tmpfs 98M 0 98M 0% /run/user/0 192.168.100.60:/XFS nfs4 10G 33M 10G 1% /nfs [root@web1 ~]# ls /nfs index.html [root@web1 ~]# umount /nfs #取消挂载 制作开机挂载 [root@web1 ~]# vim /etc/fstab 192.168.100.60:/XFS /nfs nfs defaults 0 0 [root@web1 ~]# mount -a [root@web1 ~]# reboot [root@web1 ~]# df -Th 文件系统 类型 容量 已用 可用 已用% 挂载点 devtmpfs devtmpfs 475M 0 475M 0% /dev tmpfs tmpfs 487M 0 487M 0% /dev/shm tmpfs tmpfs 487M 7.7M 479M 2% /run tmpfs tmpfs 487M 0 487M 0% /sys/fs/cgroup /dev/mapper/centos-root xfs 17G 1.6G 16G 10% / /dev/sda1 xfs 1014M 138M 877M 14% /boot 192.168.100.60:/XFS nfs4 10G 33M 10G 1% /nfs tmpfs tmpfs 98M 0 98M 0% /run/user/0
2、Ftp 介绍
文件传输协议(File Transfer Protocol,FTP),基于该协议FTP客户端与服务端可以实现共享文件、上传文件、下载文件。 FTP 基于TCP协议生成一个虚拟的连接,用户可以通过客户端向FTP服务器端上传、下载、删除文件,FTP服务器端可以同时提供给多人共享使用。
FTP服务是Client/Server(简称C/S)模式,基于FTP协议实现FTP文件对外共享及传输的软件称之为FTP服务器源端,客户端程序基于FTP协议,则称之为FTP客户端,FTP客户端可以向FTP服务器上传、下载文件。
1 2 3 4 5 FTP Server 作用:提供文件共享服务,实现上传下载 端口: 21号,建立tcp连接 默认端口 20号:传输数据
一、FTP基础 下载后使用,不能直接在ftp内打开
1 2 3 软件包: vsftpd FTP端口: 控制端口 command 21/tcp 配置文件: /etc/vsftpd/vsftpd.conf
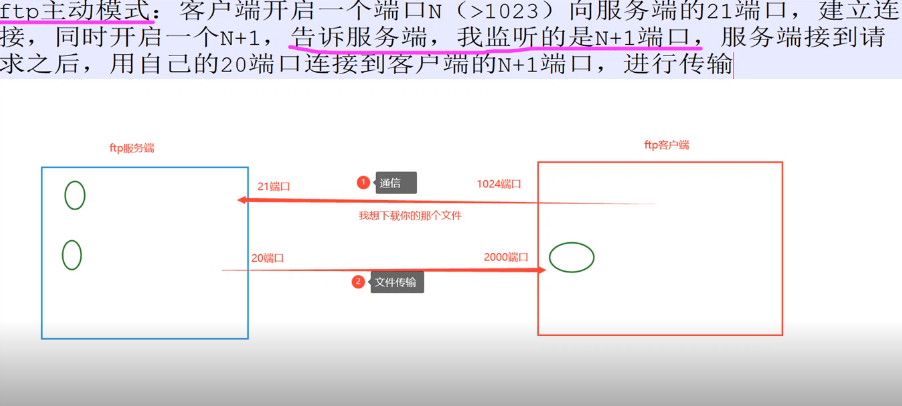
1.ftp主动模式 1 2 3 4 5 ftp主动模式:客户端开启一个端口N(>1023)向服务端的21端口,建立连接,同时开启一个N+1,告诉服务端,我监听的是N+1端口,服务端接到请求之后,用自己的20端口连接到客户端的N+1端口,进行传输。 21端口建立连接 20端口传输数据 N+1就是另一个>1023的端口
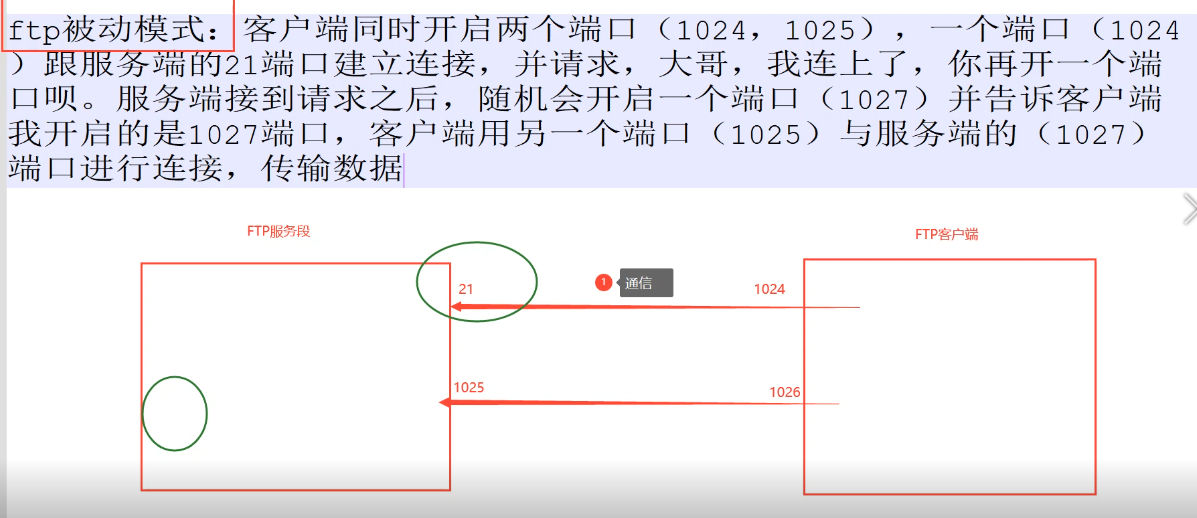
2.ftp被动模式 1 ftp被动模式:客户端同时开启两个端口(1024,1025),一个端口(1024)跟服务端的21端口建立连接,并请求,大哥,我连上了,你再开一个端口呗。服务端接到请求之后,随机会开启一个端口(1027)并告诉客户端我开启的是1027端口,客户端用另一个端口(1025)(图中用的是1026)与服务端的(1027)(图中用的是1025)端口进行连接,传输数据。
3.Vsftp 服务器简介
非常安全的FTP服务进程(Very Secure FTP daemon,Vsftpd),Vsftpd在Unix/Linux发行版中最主流的FTP服务器程序,优点小巧轻快,安全易用、稳定高效、满足企业跨部门、多用户的使用(1000用户)等。
二、vsftpd配置 1.ftp配置匿名用户登录 1 2 3 4 5 6 7 8 9 10 11 12 13 14 15 16 17 FTP Server(服务端) 实验环境--准备两台机器 关闭防火墙和selinux # systemctl stop firewalld # systemctl disable firewalld # setenforce 0 ========================================= ftp-server 192.168.100.60 client 192.168.100.70 ========================================== [root@ftp-server ~]# yum install -y vsftpd [root@ftp-server ~]# systemctl start vsftpd # 启动vsftpd [root@ftp-server ~]# id ftp uid=14(ftp) gid=50(ftp) 组=50(ftp) [root@ftp-server ~]# grep ftp /etc/passwd ftp:x:14:50:FTP User:/var/ftp:/sbin/nologin # 可以发现系统自己创建了一个名为ftp的系统用户(uid<1000),当别的机器连接后其实就是在以ftp用户的身份来进行操作的。并且可以看到该用户的shell信息为不可登陆shell。说明该用户并不能是用我们系统终端内的命令。
1 2 3 4 5 6 7 8 9 10 11 FTP默认共享目录:/var/ftp [root@ftp-server ~]# touch /var/ftp/pub/test.txt #创建文件到共享目录 [root@ftp-server ~]# systemctl enable vsftpd [root@ftp-server ~]# cd /var/ftp/ [root@ftp-server ftp]# ls pub [root@ftp-server ftp]# chown ftp.ftp pub/ -R #修改根目录的属主与属组,或者chmod修改O权限也可 或[root@ftp-server ftp]# chmod 777 /var/ftp/pub/ -R [root@ftp-server ftp]# ll total 0 drwxr-xr-x. 2 ftp ftp 22 Aug 3 03:15 pub
编辑配置文件 # /var/ftp目录本身权限不能超过755
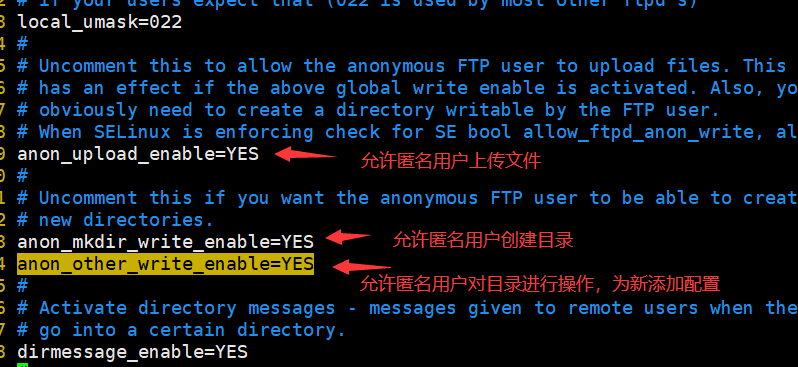
1 2 3 [root@ftp-server ~]# vi /etc/vsftpd/vsftpd.conf ----找到29行将下面的注释取消 34 anon_other_write_enable=YES anon_umask=000 #匿名用户上传下载目录权限掩码
1 [root@ftp-server ~]# systemctl restart vsftpd
1 2 3 4 5 6 7 8 9 10 11 12 13 14 15 16 17 18 19 20 21 22 23 24 25 26 27 28 29 30 31 32 33 34 35 36 37 38 FTP Clinet(客户端) 关闭防火墙和selinux [root@client ~]# yum -y install lftp #安装客户端 get命令(下载,首先要开启下载功能) [root@client ~]# lftp 192.168.100.60 lftp 192.168.100.60:~> ls drwxr-xr-x 2 0 0 6 Oct 30 2018 pub lftp 192.168.100.60:/> cd pub/ lftp 192.168.100.60:/pub> ls -rw-r--r-- 1 14 50 0 Aug 02 19:14 test.txt lftp 192.168.100.60:/pub> get test.txt #下载 lftp 192.168.100.60:/pub> exit [root@client ~]# ls #会下载到当前目录 anaconda-ks.cfg test.txt [root@client ~]# lftp 192.168.100.60 lftp 192.168.100.60:/pub> mkdir dir #也可以创建目录 mkdir ok, `dir' created put命令(上传命令,上传之前请在服务端进行配置,将上传功能打开) [root@client ~]# touch upload.txt #创建测试文件 [root@client ~]# mkdir /test/ #创建测试目录 [root@client ~]# touch /test/test1.txt #在测试目录下面创建测试文件 [root@client ~]# lftp 192.168.100.60 lftp 192.168.100.60:~> cd pub/ lftp 192.168.100.60:/pub> put /root/upload.txt #上传文件 lftp 192.168.100.60:/pub> ls -rw------- 1 14 50 0 Nov 16 12:14 upload.txt drwx------ 2 14 50 6 Aug 02 19:17 dir lftp 192.168.100.60:/pub> mirror -R /test/ #上传目录以及目录中的子文件 Total: 1 directory, 1 file, 0 symlinks New: 1 file, 0 symlinks lftp 192.168.100.60:/pub> ls drwx------ 2 14 50 23 Nov 16 12:18 test -rw------- 1 14 50 0 Nov 16 12:14 upload.txt mirror 下载目录 # 注意:进去ftp后使用的ls cd 命令不是我们centos的命令,而是lftp服务的命令,只是恰好名字一样。ftp用户是无权使用我们系统中的命令。
2.ftp配置本地用户登录 2.1服务端操作 创建 zhangsan、lisi 密码都设置为 “123456”
1 2 3 4 5 6 7 8 [root@ftp-server ~]# useradd zhangsan [root@ftp-server ~]# useradd lisi [root@ftp-server ~]# echo '123456' | passwd --stdin zhangsan #设置密码 Changing password for user zhangsan. passwd: all authentication tokens updated successfully. [root@ftp-server ~]# echo '123456' | passwd --stdin lisi Changing password for user lisi. passwd: all authentication tokens updated successfully.
配置本地用户ftp配置文件
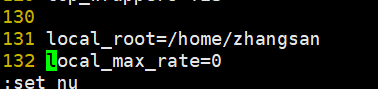
1 2 3 4 5 6 7 8 9 [root@ftp-server ~]# vim /etc/vsftpd/vsftpd.conf ---添加注释并修改 anonymous_enable=NO #将允许匿名登录关闭 # anon_umask=022 # anon_upload_enable=YES # anon_mkdir_write_enable=YES # anon_other_write_enable=YES 新添加 local_root=/home/zhangsan # 设置本地用户的FTP根目录,一般为用户的家目录 local_max_rate=0 # 限制最大传输速率(字节/秒)0为无限制
重启vsftpd
1 [root@ftp-server ~]# systemctl restart vsftpd
2.2客户端操作 1 2 3 4 5 6 7 8 9 10 11 12 13 14 15 16 17 18 19 20 [root@ftp-client ~]# lftp 192.168.153.137 -u zhangsan Password: lftp zhangsan@192.168.153.137:~> ls lftp zhangsan@192.168.153.137:~> mkdir aaa mkdir ok, `aaa' created lftp zhangsan@192.168.153.137:~> ls drwxr-xr-x 2 1000 1000 6 Aug 02 20:55 aaa lftp zhangsan@192.168.153.137:~> put /root/test.txt lftp zhangsan@192.168.153.137:~> ls drwxr-xr-x 2 1000 1000 6 Aug 02 20:55 aaa -rw-r--r-- 1 1000 1000 0 Aug 02 20:59 test.txt 服务器端查看 [root@ftp-server ~]# cd /home/zhangsan/ [root@ftp-server zhangsan]# ls aaa test.txt [root@ftp-server zhangsan]# ll total 0 drwxr-xr-x. 2 zhangsan zhangsan 6 Aug 3 04:55 aaa -rw-r--r--. 1 zhangsan zhangsan 0 Aug 3 04:59 test.txt
3.系统优化检测常用命令 *知识点: *
1 (简介:系统优化其本质是系统在提供服务的同时,承受压力过大需进行参数调优)
1、查看平均负载 1 系统负载System Load:系统CPU繁忙程度的度量,即有多少进程在等待被CPU调度,平均负载(Load Average):一段时间内系统的平均负载,这个一段时间一般取1分钟、5分钟、15分钟
1 2 3 [root@linux-server ~]# uptime 20:42:26 up 6:12, 2 users, load average: 0.00, 0.01, 0.05 1分钟平均负载,5分钟平均负载,15分钟平均负载分别是0.00,0.01,0.05
2、释放buffer和cache 1 [root@linux-server ~]# echo 3 > /proc/sys/vm/drop_caches
3、带宽使用情况 1 [root@linux-server ~]# yum install -y iftop.x86_64
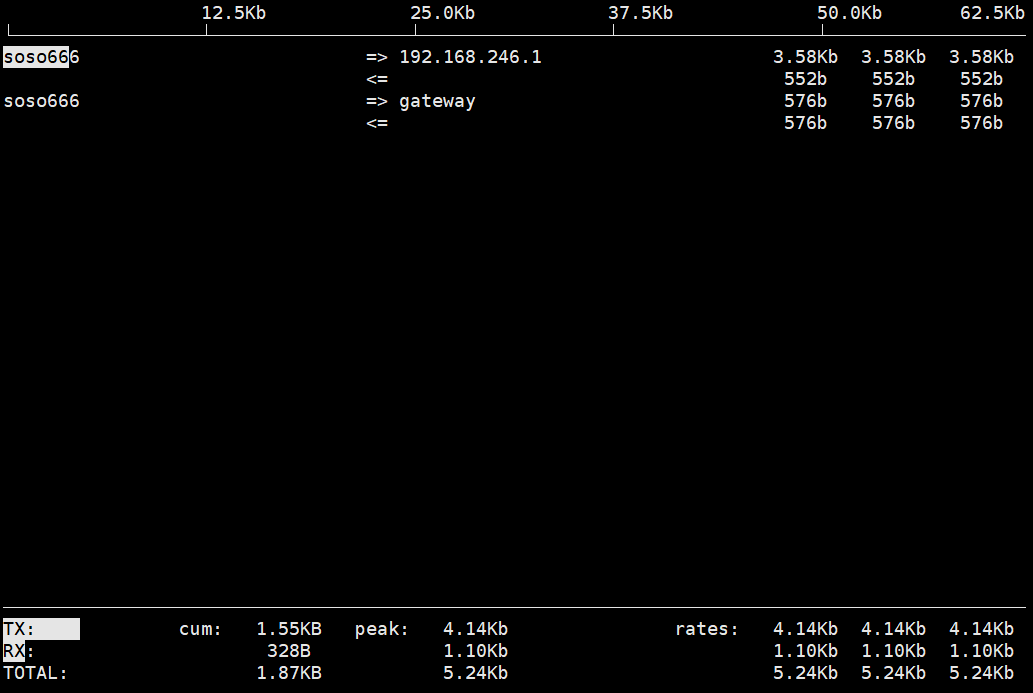
1 2 3 4 5 6 7 8 第一行:界面上面显示的是类似刻度尺的刻度范围,为显示流量图形的长条作标尺用的。 中间部分:中间的<= =>这两个左右箭头,表示的是流量的方向。=>代表发送,<=代表接收。 TX:发送流量(transmit) RX:接收流量(receive) TOTAL:总流量 Cum:运行iftop到目前时间的总流量 peak:流量峰值 rates:分别表示过去 2s 10s 40s 的平均流量
4、网络接口统计报告 1 2 [root@linux-server ~]# yum install -y nethogs.x86_64 [root@linux-server ~]# nethogs
1 2 3 4 实例1:监视ens33网络带宽 # nethogs ens33 实例2:同时监视ens33和ens34接口 # nethogs ens33 ens34