[TOC]

1、Nginx 日志配置

1.1 Nginx 日志介绍

Nginx 有一个非常灵活的日志记录模式,每个级别的配置可以有各自独立的访问日志, 所需日志模块 ngx_http_log_module 的支持,日志格式通过 log_format 命令来定义日志格式,日志对于统计和排错是非常有利的,下面总结了 nginx 日志相关的配置 包括 access_logrewrite_logerror_log

image-20240806213223772

1
2
# 设置访问日志,默认存在nginx主配置文件中。
access_log path 样式;

1.2 作用域

可以应用access_log指令的作用域分别有httpserverlocation。也就是说,在这几个作用域外使用该指令,Nginx会报错。

该例子指定日志的写入路径为/var/logs/nginx-access.log,日志格式使用默认的main

1
access_log /var/logs/nginx-access.log main;

该例子指定日志的写入路径为/var/logs/nginx-access.log,日志格式使用默认的main

1.3 log_format 指令

Nginx 预定义了名为 main 日志格式,如果没有明确指定日志格式默认使用该格式:

1
2
3
log_format main '$remote_addr - $remote_user [$time_local] '
'"$request" $status $body_bytes_sent '
'"$http_referer" "$http_user_agent"';

如果不想使用Nginx预定义的格式,可以通过log_format指令来自定义。

语法

1
log_format name [escape=default|json] string ...;
  • name 格式名称。在 access_log 指令中引用。

  • escape 设置变量中的字符编码方式是json还是default,默认是default

  • string 要定义的日志格式内容。该参数可以有多个。参数中可以使用Nginx变量。

log_format 指令中常用的一些变量:

image-20240807002232734

1.4 自定义日志格式

1
2
3
4
5
6
7
8
log_format  main  '$remote_addr - $remote_user [$time_local] "$request" '
'$status $body_bytes_sent "$http_referer" '
'"$http_user_agent" "$http_x_forwarded_for"';

access_log /var/logs/nginx-access.log main;
server {
........
}

使用log_format指令定义了一个main的格式,并在access_log指令中引用了它。假如客户端有发起请求:http://qf.com/,我们看一下我截取的一个请求的日志记录:

1
10.0.105.207 - - [01/Jul/2019:10:44:36 +0800] "GET / HTTP/1.1" 304 0 "-" "Mozilla/5.0 (Windows NT 10.0; Win64; x64) AppleWebKit/537.36 (KHTML, like Gecko) Chrome/75.0.3770.100 Safari/537.36" "-"

我们看到最终的日志记录中$remote_user$http_referer$http_x_forwarded_for都对应了一个-,这是因为这几个变量值为空。

面试时:注意日志里面的ip地址一定要在第一列。

自定义nginx访问日志JSON格式

1
2
3
4
5
6
7
8
9
10
11
12
13
14
15
16
17
18
19
20
21
22
23
24
25
26
27
28
29
30
31
32
33
34
35
36
37
38
39
#>>> 修改nginx主配置文件访问日志格式
[root@localhost ~]# vim /etc/nginx/nginx.conf
...
http {
log_format test_nginx_json '{"@timestamp":"$time_iso8601",'
'"host":"$server_addr",'
'"clientip":"$remote_addr",'
'"SendBytes":$body_bytes_sent,'
'"responsetime":$request_time,'
'"upstreamtime":"$upstream_response_time",'
'"upstreamhost":"$upstream_addr",'
'"http_host":"$host",'
'"uri":"$uri",'
'"domain":"$host",'
'"xff":"$http_x_forwarded_for",'
'"referer":"$http_referer",'
'"tcp_xff":"$proxy_protocol_addr",'
'"http_user_agent":"$http_user_agent",'
'"status":"$status"}';
access_log /var/log/nginx/access.log test_nginx_json;
}
...

#>>> 准备测试主机
[root@localhost ~]# vim /etc/nginx/conf.d/location.conf
server {
listen 80;
server_name tanke.tanke.love;
access_log /var/log/nginx-access.log test_nginx_json;
location / {
root /var/www/image/img;
index index.html;
}
}

[root@localhost ~]# nginx -t
nginx: the configuration file /etc/nginx/nginx.conf syntax is ok
nginx: configuration file /etc/nginx/nginx.conf test is successful
[root@localhost ~]# systemctl reload nginx

"@timestamp":"$time_iso8601"

  • $time_iso8601:以 ISO 8601 格式记录日志的时间戳,例如:2024-08-01T12:34:56+00:00

"host":"$server_addr"

  • $server_addr:处理请求的服务器的 IP 地址。

clientip":"$remote_addr"

  • $remote_addr:客户端的 IP 地址。

"SendBytes":$body_bytes_sent

  • $body_bytes_sent:发送给客户端的响应体的字节数。

"responsetime":$request_time

  • $request_time:处理请求的总时间(秒)。

"upstreamtime":"$upstream_response_time"

  • $upstream_response_time:从上游服务器接收响应所花的时间(秒)。如果没有上游请求,则为空。

"upstreamhost":"$upstream_addr"

  • $upstream_addr:处理请求的上游服务器的 IP 地址。如果没有上游请求,则为空。

"http_host":"$host"

  • $host:请求的主机名。

"uri":"$uri"

  • $uri:请求的 URI(不包含请求参数)。

"domain":"$host"

  • $host:重复字段,与 http_host 相同,表示请求的主机名。可以根据需要去掉一个。

"xff":"$http_x_forwarded_for"

  • $http_x_forwarded_for:包含客户端 IP 地址的 X-Forwarded-For 头字段。用于代理服务器传递客户端的真实 IP 地址。

"referer":"$http_referer"

  • $http_referer:包含请求来源的 Referer 头字段。

"tcp_xff":"$proxy_protocol_addr"

  • $proxy_protocol_addr:当使用代理协议时,客户端的真实 IP 地址。

"http_user_agent":"$http_user_agent"

  • $http_user_agent:客户端的 User-Agent 头字段,表示客户端的软件信息。

"status":"$status"

  • $status:响应的 HTTP 状态码。

image-20240806221058582

1.5 error_log 指令

错误日志在Nginx中是通过error_log指令实现的。该指令记录服务器和请求处理过程中的错误信息。

image-20240806213410889

语法

配置错误日志文件的路径和日志级别。

1
2
3
4
5
6
error_log file [level];
Default:
error_log logs/error.log warn;

# file 参数指定日志的写入位置。
# level 参数指定日志的级别。

level可以是debug, info, notice, warn, error, crit, alert,emerg中的任意值。可以看到其取值范围是按紧急程度从低到高排列的。只有日志的错误级别等于或高于level指定的值才会写入错误日志中。

Nginx 的错误日志级别有以下几种,并按记录信息量从多到少排列:

  1. debug:最详细的日志级别,会记录大量的调试信息,通常用于开发和测试环境,以便开发者能够追踪代码的执行情况。
  2. info:此级别记录的信息比 debug 少,但仍然包含了一些有用的状态信息,例如 Nginx 启动或重载配置时的信息。
  3. notice:记录的信息更为精简,通常包含一些重要的事件通知,比如完成某个操作或达到某个条件。
  4. warn:这个级别记录的是警告信息,表明可能存在的问题,但不是严重错误,例如配置中的语法问题或不建议的做法。
  5. error:默认的日志级别,记录错误信息,这些通常是需要管理员注意。

基本用法

1
error_log /var/logs/nginx/nginx-error.log;

配置段:http, mail, stream, server, location作用域。

例子中指定了错误日志的路径为:/var/logs/nginx/nginx-error.log,日志级别使用默认的 error

1.6 rewrite_log 指令,了解

ngx_http_rewrite_module模块提供的。用来记录重写日志的。启用时将在error log中记录重写日志。
基本语法:

1
2
3
4
rewrite_log on | off;

默认值:
rewrite_log off;

配置段: http, server, location, if作用域。

image-20240806215746234

1
2
3
4
5
6
7
8
9
10
11
12
13
14
15
16
17
18
19
20
21
22
23
24
25
26
27
#>>> 配置文件准备
rewrite_log on;
server {
listen 80;
server_name localhost;
location /a {
root /html;
index index.html index.htm;
rewrite .* /b/index.html permanent;
}

location /b {
root /html;
index index.html index.htm;
}
}

#>>> 创建网站资源路径
[root@localhost ~]# mkdir -p /html/{a,b}
[root@localhost ~]# echo "a" > /html/a/index.html
[root@localhost ~]# echo "b" > /html/b/index.html

#>>> 检查配置文件语法是否错误,热加载nginx
[root@localhost ~]# nginx -t
[root@localhost ~]# systemctl reload nginx

#>>> 游览器访问http://rewrite.tanke.love/a

查看日志:

image-20240806215820332

1.7 Nginx 日志配置总结

Nginx中通过access_logerror_log指令配置访问日志和错误日志,通过log_format我们可以自定义日志格式。

详细的日志配置信息可以参考Nginx官方文档

1.8 Nginx的日志

1
2
3
4
5
6
7
8
9
10
11
12
13
14
15
16
17
18
19
20
21
22
23
24
25
26
27
[root@192 ~]# rpm -ql nginx |grep log
/etc/logrotate.d/nginx
/var/log/nginx
[root@192 ~]# vim /etc/logrotate.d/nginx
/var/log/nginx/*.log { #指定需要轮转处理的日志文件
daily #日志文件轮转周期,可用值为: daily/weekly/yearly
missingok # 忽略错误信息
rotate 7 # 轮转次数,即最多存储7个归档日志,会删除最久的归档日志
minsize 5M #限制条件,大于5M的日志文件才进行分割,否则不操作
dateext # 以当前日期作为命名格式
compress # 轮循结束后,已归档日志使用gzip进行压缩
delaycompress # 与compress共用,最近的一次归档不要压缩
notifempty # 日志文件为空,轮循不会继续执行
create 640 nginx nginx #新日志文件的权限
sharedscripts #有多个日志需要轮询时,只执行一次脚本
postrotate # 将日志文件转储后执行的命令。以endscript结尾,命令需要单独成行
if [ -f /var/run/nginx.pid ]; then #判断nginx的PID。# 默认logrotate会以root身份运行
kill -USR1 `cat /var/run/nginx.pid`
fi
endscript
}

执行命令:
[root@192 nginx]# /usr/sbin/logrotate -f /etc/logrotate.conf
创建计划任务:
[root@192 nginx]# crontab -e
59 23 * * * /usr/sbin/logrotate -f /etc/logrotate.conf

2、Nginx 的平滑升级

2.1 为什么要对 nginx 平滑升级

随着 nginx 越来越流行,并且 nginx 的优势也越来越明显,nginx 的版本迭代也来时加速模式,1.9.0版本的nginx更新了许多新功能,伴随着 nginx 的广泛应用,版本升级必然越来越快,线上业务不能停,此时 nginx 的升级就需要平滑升级。

nginx 方便地帮助我们实现了平滑升级。其原理简单概括,就是:
(1)在不停掉老进程的情况下,启动新进程。
(2)老进程负责处理仍然没有处理完的请求,但不再接受处理请求。
(3)新进程接受新请求。
(4)老进程处理完所有请求,关闭所有连接后,停止。
这样就很方便地实现了平滑升级。一般有两种情况下需要升级 nginx,一种是确实要升级 nginx 的版本,另一种是要为 nginx 添加新的模块。

2.2 Nginx 平滑升级描述

2.2.1 多进程模式下的请求分配方式

nginx 默认工作在多进程模式下,即主进程(master process)启动后完成配置加载和端口绑定等动作,fork出指定数量的工作进程(worker process),这些子进程会持有监听端口的文件描述符(fd),并通过在该描述符上添加监听事件来接受连接。

2.2.2 信号的接收和处理

nginx 主进程在启动完成后会进入等待状态,负责响应各类系统消息,如SIGCHLD、SIGHUP、SIGUSR2等。

1. Nginx信号简介

主进程支持的信号

  • TERM, INT: 立刻退出
  • QUIT: 等待工作进程结束后再退出
  • KILL: 强制终止进程
  • HUP: 重新加载配置文件,使用新的配置启动工作进程,并逐步关闭旧进程。
  • USR1: 重新打开日志文件
  • USR2: 启动新的主进程,实现热升级
  • WINCH: 逐步关闭工作进程

工作进程支持的信号

  • TERM, INT: 立刻退出
  • QUIT: 等待请求处理结束后再退出
  • USR1: 重新打开日志文件

2.3 Nginx 平滑升级实战

  1. 查看现有的 nginx 编译参数
1
2
3
4
5
6
[root@localhost ~]# /usr/local/nginx/sbin/nginx -V
nginx version: nginx/1.24.0
built by gcc 4.8.5 20150623 (Red Hat 4.8.5-44) (GCC)
built with OpenSSL 1.0.2k-fips 26 Jan 2017
TLS SNI support enabled
configure arguments: --prefix=/usr/local/nginx --group=nginx --user=nginx --sbin-path=/usr/local/nginx/sbin/nginx --conf-path=/etc/nginx/nginx.conf --error-log-path=/var/log/nginx/error.log --http-log-path=/var/log/nginx/access.log --http-client-body-temp-path=/tmp/nginx/client_body --http-proxy-temp-path=/tmp/nginx/proxy --http-fastcgi-temp-path=/tmp/nginx/fastcgi --pid-path=/var/run/nginx.pid --lock-path=/var/lock/nginx --with-http_stub_status_module --with-http_ssl_module --with-http_gzip_static_module --with-pcre --with-http_realip_module --with-stream
  1. 上传新版本的源码包,解压到/usr/local/

按照原来的编译参数安装 nginx 的方法进行安装,只需要到 make,千万不要 make install 。如果make install 会将原来的配置文件覆盖

1
2
3
4
5
6
7
[root@localhost ~]# tar xf nginx-1.25.4.tar.gz  -C /usr/local/

[root@localhost ~]# cd /usr/local/nginx-1.25.4/

[root@localhost nginx-1.25.4]# ./configure --prefix=/usr/local/nginx --group=nginx --user=nginx --sbin-path=/usr/local/nginx/sbin/nginx --conf-path=/etc/nginx/nginx.conf --error-log-path=/var/log/nginx/error.log --http-log-path=/var/log/nginx/access.log --http-client-body-temp-path=/tmp/nginx/client_body --http-proxy-temp-path=/tmp/nginx/proxy --http-fastcgi-temp-path=/tmp/nginx/fastcgi --pid-path=/var/run/nginx.pid --lock-path=/var/lock/nginx --with-http_stub_status_module --with-http_ssl_module --with-http_gzip_static_module --with-pcre --with-http_realip_module --with-stream

[root@localhost nginx-1.25.4]# make

==千万不要make install==

  1. 备份原 nginx 二进制文件

备份老版本nginx二进制启动文件和 nginx 的配置文件(期间nginx不会停止服务)

1
[root@localhost nginx-1.25.4]# mv /usr/local/nginx/sbin/nginx{,_old}
  1. b[root@localhost nginx-1.25.4]# cp /usr/local/nginx-1.25.4/objs/nginx /usr/local/nginx/sbin/

  2. 测试新版本的nginx是否正常

1
2
3
[root@localhost nginx-1.25.4]# /usr/local/nginx/sbin/nginx -t
nginx: the configuration file /etc/nginx/nginx.conf syntax is ok
nginx: configuration file /etc/nginx/nginx.conf test is successful
  1. 给nginx发送平滑迁移信号(若不清楚pid路径,请查看nginx配置文件)

USR2: 启动新的主进程,实现热升级

1
[root@localhost nginx-1.25.4]# kill -USR2 `cat /var/run/nginx.pid`
  1. 查看nginx pid,会出现一个nginx.pid.oldbin
1
2
3
[root@localhost nginx-1.25.4]# ll /var/run/nginx.pid*
-rw-r--r--. 1 root root 6 3月 31 21:39 /var/run/nginx.pid
-rw-r--r--. 1 root root 5 3月 31 20:51 /var/run/nginx.pid.oldbin
  1. 从容关闭旧的Nginx进程(WINCH: 逐步关闭工作work进程)
1
[root@localhost nginx-1.25.4]# kill -WINCH `cat /var/run/nginx.pid.oldbin`
  1. HUP: 重新加载配置文件,使用新的配置启动工作进程,并逐步关闭旧进程。
1
[root@localhost nginx-1.25.4]# kill -HUP `cat /var/run/nginx.pid.oldbin`
  1. 结束工作进程,完成此次升级

QUIT: 等待请求处理结束后再退出

1
[root@localhost nginx-1.25.4]#  kill -QUIT `cat /var/run/nginx.pid.oldbin`
  1. 验证Nginx是否升级成功
1
2
3
4
5
6
[root@localhost nginx-1.25.4]# /usr/local/nginx/sbin/nginx -V
nginx version: nginx/1.25.4
built by gcc 4.8.5 20150623 (Red Hat 4.8.5-44) (GCC)
built with OpenSSL 1.0.2k-fips 26 Jan 2017
TLS SNI support enabled
configure arguments: --prefix=/usr/local/nginx --group=nginx --user=nginx --sbin-path=/usr/local/nginx/sbin/nginx --conf-path=/etc/nginx/nginx.conf --error-log-path=/var/log/nginx/error.log --http-log-path=/var/log/nginx/access.log --http-client-body-temp-path=/tmp/nginx/client_body --http-proxy-temp-path=/tmp/nginx/proxy --http-fastcgi-temp-path=/tmp/nginx/fastcgi --pid-path=/var/run/nginx.pid --lock-path=/var/lock/nginx --with-http_stub_status_module --with-http_ssl_module --with-http_gzip_static_module --with-pcre --with-http_realip_module --with-stream
  1. 杀死旧版本的worker 进程 (生产环境勿用)
1
2
3
4
5
[root@localhost nginx-1.25.4]# ps -ef |grep nginx
root 19525 1 0 21:39 ? 00:00:00 nginx: master process ./nginx
nginx 19526 19525 0 21:39 ? 00:00:00 nginx: worker process
nginx 19532 1 0 21:40 ? 00:00:00 nginx: worker process
[root@localhost nginx-1.25.4]# kill -9 19532
  1. 访问验证
1
2
3
4
5
6
7
8
9
10
[root@web01 objs]# curl  -I localhost
HTTP/1.1 200 OK
Server: nginx/1.25.4
Date: Tue, 06 Aug 2024 15:10:46 GMT
Content-Type: text/html
Content-Length: 615
Last-Modified: Fri, 02 Aug 2024 03:32:22 GMT
Connection: keep-alive
ETag: "66ac5346-267"
Accept-Ranges: bytes

3、Nginx 错误页面配置

nginx错误页面包括404 403 500 502 503 504等页面,只需要在server中增加以下配置即可:

1
2
3
4
5
6
7
8
9
10
11
12
13
server {
listen 80;
server_name localhost;
location / {
root /usr/share/nginx/html;
index index.html index.htm;
}
error_page 404 /404.html;
location = /404.html {
root /usr/share/nginx/html;
index 404.html;
}
}

注意:

/usr/local/nginx/html/ 路径下必须有404.html这个文件!!!代码如下:

1
2
3
4
5
6
7
8
9
10
11
12
13
14
15
16
17
18
19
20
21
22
23
24
25
26
27
28
29
30
31
32
33
34
35
36
37
[root@localhost html]# vim 404.html
<!DOCTYPE html>
<html lang="zh-CN">
<head>
<meta charset="UTF-8">
<meta name="viewport" content="width=device-width, initial-scale=1.0">
<title>404 - 页面未找到</title>
<style>
body {
font-family: Arial, sans-serif;
background-color: #f0f0f0;
text-align: center;
padding: 50px;
}
h1 {
font-size: 48px;
color: #333;
}
p {
font-size: 24px;
color: #666;
}
a {
color: #0077cc;
text-decoration: none;
}
a:hover {
text-decoration: underline;
}
</style>
</head>
<body>
<h1>404</h1>
<p>抱歉,您访问的页面不存在。</p>
<p><a href="/">返回首页</a></p>
</body>
</html>

展示效果:

image-20240806232002237

4、Nginx 流量控制

Nginx 的流量控制主要包括连接数限制、请求速率限制和带宽限制,这些机制有助于保护服务器免受过多请求的影响,防止系统因过载而性能下降或崩溃

以下是 Nginx 流量控制的几种方式:

  • 连接数限制:通过 limit_conn_zone 模块,可以限制同一 IP 地址的并发连接数。这可以防止单个用户占用过多服务器资源,从而影响其他用户的正常使用。
  • 请求速率限制:使用 limit_req 模块,可以限制同一 IP 在特定时间内的请求次数。这种限制可以帮助减缓对服务器的压力,特别是在高流量场景下。
  • 带宽限制:通过 limit_rate 指令,可以限制来自同一 IP 地址的数据下载或上传速度。这有助于平衡服务器带宽的使用,确保所有用户都能获得合理的网络速度。

此外,在配置 Nginx 流量控制时,可以通过编辑配置文件来实现所需的限制规则。例如,可以设置每个 IP 地址每秒只能建立一定数量的新连接,或者每分钟只能发出一定数量的请求。还可以自定义在达到限制条件时的返回错误代码,以便客户端能够理解请求被拒绝的原因。

4.1 流量限制

流量限制 (rate-limiting),用来限制用户在给定时间内HTTP请求的数量。

4.1.1 Nginx如何限流

Nginx的”流量限制”使用漏桶算法(leaky bucket algorithm),用以处理带宽有限时的突发情况。就好比,一个桶口在倒水,桶底在漏水的水桶。如果桶口倒水的速率大于桶底的漏水速率,桶里面的水将会溢出;同样,在请求处理方面,水代表来自客户端的请求,水桶代表根据”先进先出调度算法”等待被处理的请求队列,桶底漏出的水代表离开缓冲区被服务器处理的请求,桶口溢出的水代表被丢弃和不被处理的请求。

4.1.2 基本限流配置

“流量限制”配置两个主要的指令,limit_req_zonelimit_req,如下所示:

1
2
3
4
5
6
7
8
9
10
11
12
13
14
15
16
17
18
19
20
21
22
23
# 192.168.174.20 代理服务器配置

[root@localhost ~]# vim /etc/nginx/conf.d/limit_server.conf
limit_req_zone $binary_remote_addr zone=mylimit:10m rate=1r/s;
upstream myweb {
server 192.168.174.21:80;
}
server {
listen 80;
server_name localhost;

location /login {
limit_req zone=mylimit;
proxy_pass http://myweb;
proxy_set_header Host $host:$server_port;
proxy_set_header X-Real-IP $remote_addr;
proxy_set_header X-Forwarded-For $proxy_add_x_forwarded_for;
}
}

[root@localhost ~]# nginx -t

[root@localhost ~]# systemctl reload nginx
1
2
3
4
5
6
7
8
9
10
11
12
13
14
15
16
17
# 192.168.174.21后端服务器配置:
[root@localhost ~]# vim /etc/nginx/conf.d/localtion_server.conf
server {
listen 80;
server_name localhost;
location /login {
root /usr/share/nginx/html;
index index.html index.html;
}
}

[root@localhost ~]# mkdir /usr/share/nginx/html/login
[root@localhost ~]# echo "login" > /usr/share/nginx/html/login/index.html

[root@localhost ~]# nginx -t

[root@localhost ~]# systemctl reload nginx
  • $binary_remote_addr:表示客户端的 IP 地址,二进制格式的表示方式,节省内存。
  • zone=mylimit:10m:定义一个名为 mylimit 的共享内存区域,大小为 10MB,用于存储限速信息。10MB 可以存储大约16万个客户端的速率限制数据。
  • rate=1r/s:设置速率限制为每秒1个请求。

创建一个速率限制区域,用于记录客户端 IP 地址及其请求速率,并限制每个 IP 地址每秒只能发送1个请求。

4.1.3 处理突发请求

如果我们在1000毫秒内接收到2个请求,怎么办?对于第二个请求,Nginx将给客户端返回错误。这可能并不是我们想要的结果,因为应用本质上趋向于突发性。相反地,我们希望缓冲任何超额的请求,然后及时地处理它们。我们更新下配置,在limit_req中使用burst参数:

1
2
3
4
5
6
7
8
9
10
11
12
13
14
15
16
17
18
19
20
21
22
[root@localhost ~]# vim /etc/nginx/conf.d/limit_server.conf 
# 针对单个用户
limit_req_zone $binary_remote_addr zone=mylimit:10m rate=1r/s;
upstream myweb {
server 192.168.174.21:80;
}

server {
listen 80;
server_name localhost;
location /login {
limit_req zone=mylimit burst=20;
proxy_pass http://myweb;
proxy_set_header Host $host:$server_port;
proxy_set_header X-Real-IP $remote_addr;
proxy_set_header X-Forwarded-For $proxy_add_x_forwarded_for;
}
}

[root@localhost ~]# nginx -t

[root@localhost ~]# systemctl reload nginx

burst参数定义了超出zone指定速率的情况下(假设速率限制在每秒1个请求,或每100毫秒一个请求),客户端还能发起多少请求。上一个请求100毫秒内到达的请求将会被放入队列,我们将队列大小设置为20。

这意味着,如果从一个给定IP地址发送21个请求,Nginx会立即将第一个请求发送到上游服务器群,然后将余下20个请求放在队列中。然后每100毫秒转发一个排队的请求,只有当传入请求使队列中排队的请求数超过20时,Nginx才会向客户端返回错误。

4.2 配置流量控制相关功能

4.2.1 配置日志记录

默认情况下,Nginx会在日志中记录由于流量限制而延迟或丢弃的请求,如下所示:

1
2024/08/06 23:45:20 [error] 1888#1888: *34 limiting requests, excess: 0.061 by zone "mylimit", client: 192.168.174.1, server: localhost, request: "GET /login/ HTTP/1.1", host: "192.168.174.20"

日志条目中包含的字段:

  • limiting requests -Nginx 拒绝了该请求。
  • excess - 表示请求超过速率限制的程度。在这种情况下,超出了 0.061 秒。
  • zone - 使用 mylimit 速率限制区域。
  • client - 发起请求的客户端IP地址
  • server - 服务器IP地址或主机名
  • request - 客户端发起的实际HTTP请求
  • host - 请求的主机名

默认情况下,Nginx以error级别来记录被拒绝的请求,如上面示例中的[error]所示(Nginx以较低级别记录延时请求,一般是info级别)。如要更改Nginx的日志记录级别,需要使用limit_req_log_level指令。这里,我们将被拒绝请求的日志记录级别设置为warn

一定要定义日志位置和级别才可以:

image-20240806234906526

1
2
3
4
5
6
7
8
9
10
11
12
13
14
15
16
17
18
19
20
21
22
#>>> 修改配置文件
[root@localhost ~]# vim /etc/nginx/conf.d/limit_server.conf
limit_req_zone $binary_remote_addr zone=mylimit:10m rate=1r/s;
upstream myweb {
server 192.168.174.21:80;
}
server {
listen 80;
server_name localhost;

location /login {
limit_req zone=mylimit;
limit_req_log_level warn; # 修改日志级别为警告,默认错误级别
proxy_pass http://myweb;
proxy_set_header Host $host:$server_port;
proxy_set_header X-Real-IP $remote_addr;
proxy_set_header X-Forwarded-For $proxy_add_x_forwarded_for;
}
}

[root@localhost ~]# nginx -t
[root@localhost ~]# systemctl reload nginx

image-20240806234918164

4.2.1 发送到客户端的错误代码

一般情况下,客户端超过配置的流量限制时,Nginx响应状态码为503(Service Temporarily Unavailable)。可以使用limit_req_status指令来设置为其它状态码(例如下面的404状态码):

1
2
3
4
5
6
7
8
9
10
11
12
13
14
15
16
17
18
19
20
21
[root@localhost ~]# vim /etc/nginx/conf.d/limit_server.conf 
limit_req_zone $binary_remote_addr zone=mylimit:10m rate=1r/s;
upstream myweb {
server 192.168.174.21:80;
}
server {
listen 80;
server_name www.tanke.love;

location /login {
limit_req zone=mylimit;
limit_req_log_level warn;
limit_req_status 404; # 自定义返回状态码
proxy_pass http://myweb;
proxy_set_header Host $host:$server_port;
proxy_set_header X-Real-IP $remote_addr;
proxy_set_header X-Forwarded-For $proxy_add_x_forwarded_for;
}
}
[root@localhost ~]# nginx -t
[root@localhost ~]# systemctl reload nginx

5、Nginx 访问控制

5.1 nginx 访问控制模块

  1. ngx_http_access_module:这是Nginx中最基本的访问控制模块,允许根据客户端的IP地址、请求方法、请求URI等信息来控制访问权限。可以设置allow指令来允许特定IP或IP段访问,使用deny指令来禁止某些IP或IP段访问。
  2. ngx_http_auth_request_module:这个模块提供了基于HTTP基本认证的访问控制。通过设置用户名和密码,可以限制未授权的用户访问特定的资源或路径。

5.2 基于IP的访问控制

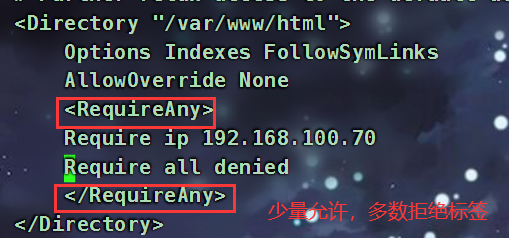
​ 基于IP的访问控制是Nginx中实现访问控制的一种方式,主要通过内置的ngx_http_access_module模块来实现。这个模块允许你根据客户端的IP地址来控制对服务器资源的访问权限。

以下是一些关于Nginx基于IP访问控制的具体信息:

  • 配置语法:在Nginx的配置文件中,你可以使用allowdeny指令来设置IP访问控制。这些指令可以指定单个IP地址、IP地址范围或者所有IP地址(all)。

  • 配置示例:例如,如果你想允许特定IP地址(如192.168.1.1)访问某个路径(如/path/),同时拒绝其他所有IP地址的访问,你可以这样配置:

  • location /path/ {
        allow 192.168.1.1;
        deny all;
    }    
    
    1
    2
    3
    4
    5
    6
    7
    8
    9
    10
    11
    12
    13

    - **应用场景**:这种访问控制方式适用于需要对特定IP地址或IP段进行访问限制的情况,比如设置IP白名单允许特定用户访问,或者设置IP黑名单禁止特定用户访问。

    **配置语法**

    ```shell
    Syntax:allow address | CIDR | unix: | all;
    default:默认无
    Context:http,server,location

    Syntax:deny address | CIDR | unix: | all;
    default:默认无
    Context:http,server,location

配置测试

1
2
3
4
5
6
7
8
9
10
11
12
13
14
15
16
17
18
19
20
21
22
#>>> 编写配置文件
[root@localhost ~]# vim /etc/nginx/conf.d/access_mod.conf
server {
listen 80;
server_name localhost;
location ~ ^/admin {
root /www/html;
index index.html index.hml;
deny 192.168.1.8;
allow all;
#deny 192.168.1.8;
}
}

#>>> 创建发布目录
[root@localhost ~]# mkdir -p /www/html/admin

#>>> 创建发布文件
[root@localhost ~]# echo "admin" > /www/html/admin/index.html

#需要注意:
如果先允许访问,在定义拒绝访问。那么拒绝访问不生效。

指定location拒绝所有请求

如果你想拒绝某个指定URL地址的所有请求,而不是仅仅对其限速,只需要在location块中配置deny all指令:

1
2
3
4
5
6
7
8
9
10
[root@localhost ~]# vim /etc/nginx/conf.d/access_mod.conf

server {
listen 80;
server_name localhost;
location /foo.html {
root /home/www/html;
deny all;
}
}

5.3 基于用户的信任登录

​ 基于用户的信任登录是Nginx中实现访问控制的一种方式,主要通过内置的ngx_http_auth_basic_module模块来实现。这个模块允许你要求用户输入正确的用户名和密码才能访问服务器资源。

以下是一些关于Nginx基于用户信任登录的具体信息:

  • 配置语法:在Nginx的配置文件中,你可以使用auth_basic指令来启用基本认证,并使用auth_basic_user_file指令指定包含用户名和加密后密码的文件路径。

  • 配置示例:例如,如果你想要求用户输入正确的用户名和密码才能访问某个路径(如/path/),你可以这样配置:

    • location /path/ {
          auth_basic "Restricted Content";
          auth_basic_user_file /etc/nginx/.htpasswd;
      }
      
      1
      2
      3
      4
      5
      6
      7
      8
      9
      10
      11
      12
      13
      14

      - **应用场景**:这种访问控制方式适用于需要对用户进行身份验证的情况,比如限制只有授权用户才能访问某些敏感数据或功能。

      **配置语法**

      ```shell
      Syntax:auth_basic string | off;
      default:auth_basic off;
      Context:http,server,location,limit_except

      Syntax:auth_basic_user_file file;
      default:默认无
      Context:http,server,location,limit_except
      file:存储用户名密码信息的文件。

配置示例

1
2
3
4
5
6
7
8
9
10
11
12
#>>> 编写配置文件
[root@localhost ~]# vim /etc/nginx/conf.d/auth_mod.conf
server {
listen 80;
server_name localhost;
location ~ ^/admin {
root /www/html;
index index.html index.hml;
auth_basic "Auth access test!";
auth_basic_user_file /etc/nginx/auth_conf;
}
}

auth_basic不为off,开启登录验证功能,auth_basic_user_file加载账号密码文件。

建立口令文件

1
2
3
4
5
6
7
8
9
10
11
12
13
14
15
16
17
#>>> 创建发布目录
[root@localhost ~]# mkdir /www/html/admin -p

#>>> 创建发布文件
[root@localhost ~]# echo "hello qf" > /home/www/html/admin/index.html

#>>> htpasswd 是开源 http 服务器 apache httpd 的一个命令工具,用于生成 http 基本认证的密码文件
[root@localhost ~]# yum install -y httpd-tools

#>>> 第一次新建用户
[root@localhost ~]# htpasswd -cm /etc/nginx/auth_conf user10

#>>> 第二次添加用户
[root@localhost ~]# htpasswd -m /etc/nginx/auth_conf user20
[root@localhost ~]# cat /etc/nginx/auth_conf
user10:$apr1$MOa9UVqF$RlYRMk7eprViEpNtDV0n40
user20:$apr1$biHJhW03$xboNUJgHME6yDd17gkQNb0
  • -c:创建一个新的密码文件。如果文件已经存在,这个选项将覆盖它。
  • -m:使用 MD5 算法对密码进行加密。
  • /etc/nginx/auth_conf:指定存储用户名和密码的文件路径。
  • user10:新创建的用户名。

访问测试

image-20240806235113868